Friday, July 27, 2012

The Woodstove!

We decided that after last winter we were NOT going to go through that much heating oil again and went out and bought ourselves the most efficient wood stove on the market. Our thinking was that we could always open a window if we were too hot. I wanted a flat top so I could cook on it if the power went out and we wanted one large enough to heat the entire house without having to stoke it every 4 hours.

So we bought the stove....

Then we chopped some wood...about 7 cords worth...


After we figured that we had enough wood for the winter we started to play with tiles.
First Pete had to center the wood stove to find out where the big hole had to go...

Next came the big hole...and nearly trying to kill off our neighbours getting the chimney liner installed!

Peter put in the electrical for the fan and ducting for an outside air intake..then the tiling began...

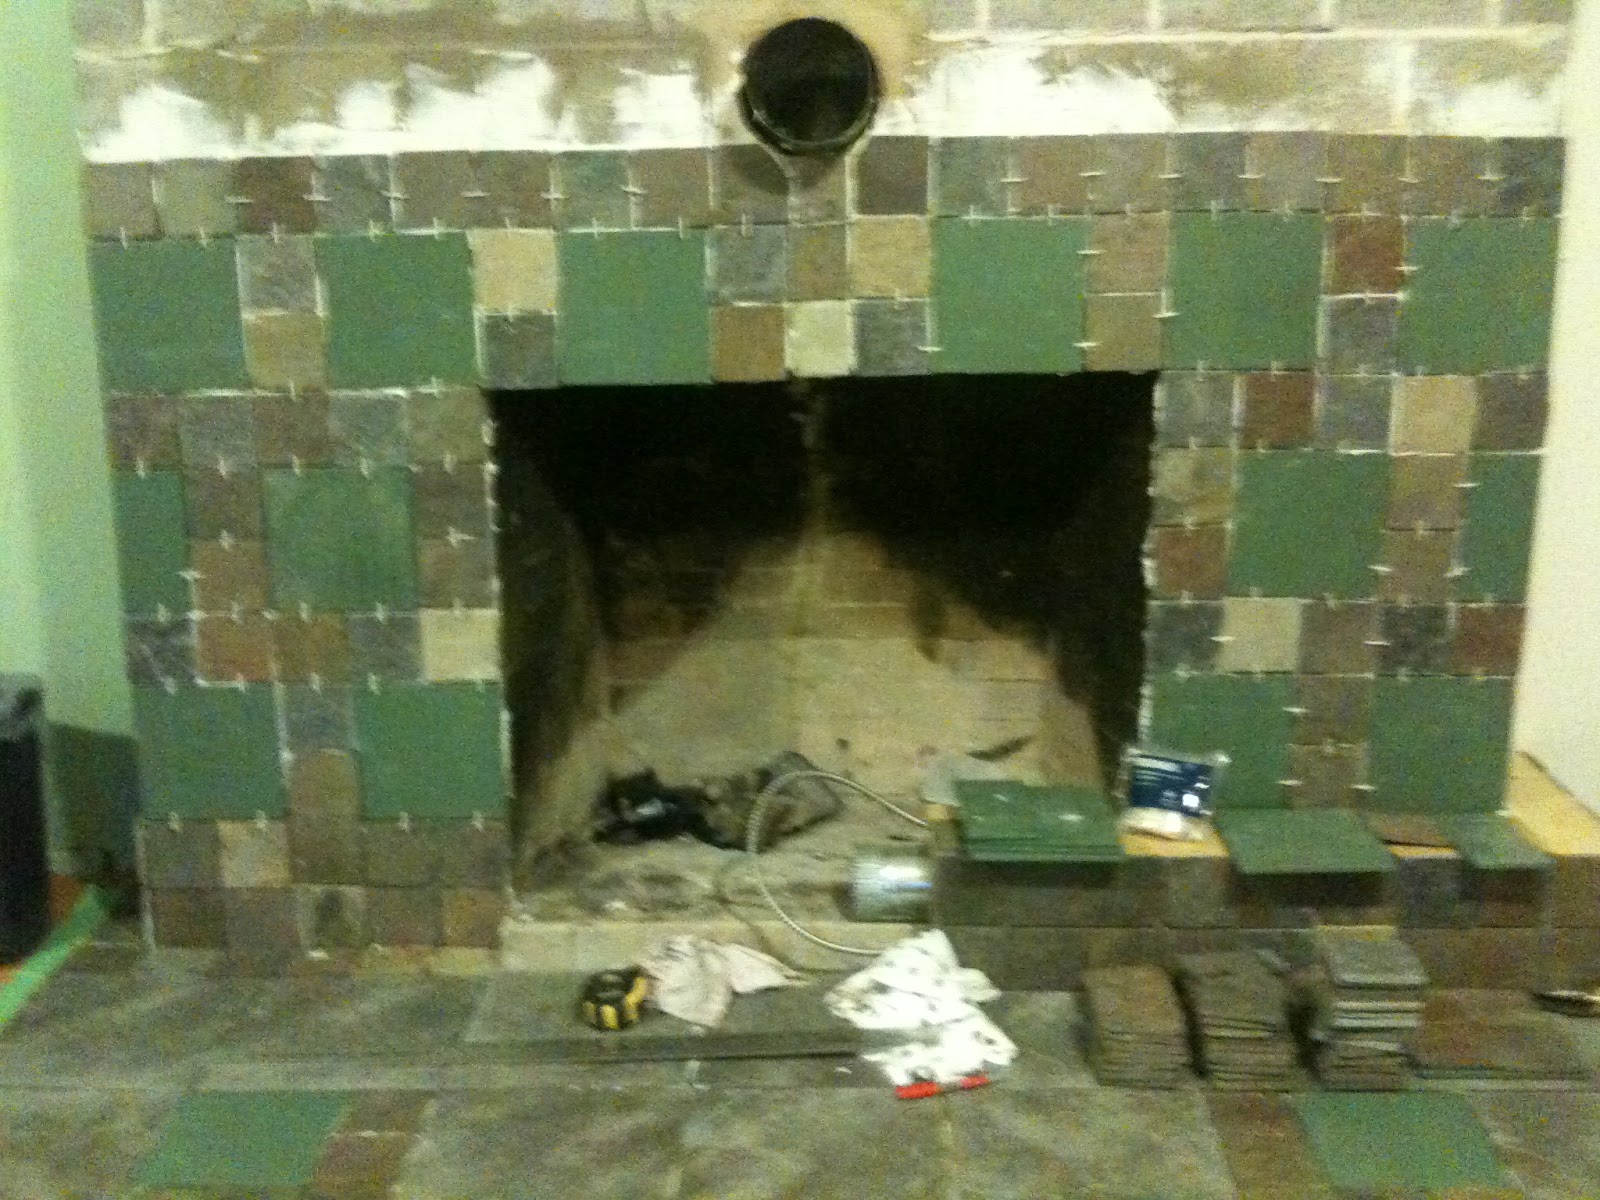
Still needs to be grouted, but the tile is up!
 In true form, one project ALWAYS leads to another in our house...so while Pete was busy laying tile, I was busy removing old lino. I call these photos "purging the 70's"
and I could not be happier! Bring on the tile! :)


The back yard and garden NOW!

It has been an incredible amount of work getting the yard into shape but I can honestly say that it is something that we can be proud of! My garden gained another 10 feet this year when we put the fence up along the back fence line and it has been growing like mad! Mental note for next year...thin the plants out!

I had to build A frame trelises as the squash plant were beginning to take over all my ground space! Hopefully they will do well.

I love the yellow of the squash flower. It's so pretty and bright.

We put up a berm along the fence line and are currently working at growing sweetpeas and berry bushes up it. The grass seed that we planted here has been growing like mad! I have to mow it twice a week!
 The yard is getting better and better all the time! Now to get rid of all the dandilions and clover and we'll be doing well!
:)

The Yard...continued...

The yard has been an ongoing project. Since the last post in 2011 we have trimmed down the tree in the front, dug out underneath the deck and laid bark mulch, put up fencing in the back, built a berm against the fence, extended the garden, laid grass seed where there was once blackberries and on and on it goes...

This is our friend Gord up in the tree after he had cut his way through to the top


 What the cleanup looked like....

We had to redo the drainage at the back to run along the property line. This box is where it ends and turns left along the fence line
It took a LONG time to get to the end of the fence but we finally made it!
We finally finished digging out on the right side of the house. Where you see the lid is our cleanout for our drain system


then we have been working on the front of the house and digging out the dirt from under the deck as it was up too high and allowing moisture to get under the siding.  We put weed cloth and finished it off with bark mulch

We got some REALLY cool old stuff from our friend Bren which just added to the look of the front of the house. 
 Looking better and better all the time!

Tuesday, April 12, 2011

The Yard

I LOVE our yard!
It is the one thing that called to me when we bought our house. As you can see we had a LOT of work to do!We started clearing out the blackberry bushes that were taking over the back of the yard. Much to our surprise we had an extra 20 feet of yard space and a fence under all that!
LOTS of brush burning happened and there's still LOTS to do before the burning season closes.
Then, we attacked the front yard. The cedar trees were about 15 feet taller than they needed to be and they really took away any sunlight that we could have had in the house. The front yard was very dark. So at first we trimmed the hedges.
Then I got a smoking deal on a chainsaw at Canadian Tire so we topped the hedges.
Now you could see sunlight.
I didn't like these 3 little bushes that were growing in the front yard so Peter took out his chainsaw again and cut them down.
Now the front of the yard is open and lovely. There was a bush growing at the corner of the deck that I had Peter remove as I didn't want it causing problems with the deck in the future.
I LOVE our yard! Now we can enjoy it!

The Drain Tile

December 12, 2010

It was Peter's Birthday. I woke up to go to work at 3:30 am and it was raining REALLY hard. We ended up having 2 inches of water in front of the garage and about an inch of water inside the garage. So, as much as I hated to wake Peter up at that god awful hour, I had to. So began our drain tile project (which we intended on starting in the spring). We had 7 inches of rain fall on that day and the current system just couldn't keep up to it. Thankfully the water hadn't breached into the front door yet, but it was about half an inch shy of doing that. Had it gotten in, our renovation to the family room would have been ruined.

So, this was the beginning trench just to try and get the water away from the house
This photo was taken around 11:30 am when I had come back home from work and sat outside for a few hours with our shop vac sucking up water and dumping it into our trench just to try and get ahead of all the rain.

LOTS of digging was involved in this project

We finally get to the point that we have dug down deep enough to lay the new drain tile. The old tile that we found was in poor shape and all plugged with mud. They never surrounded it with gravel and did it properly or there would have never been a problem.
We have different pipes for different drainage issues. One is for the water coming from the roof, and the other is for ground water. We ended up finding the old drain tile that ran through the back yard and cleaned it out and tied into it after we found that it was running well. It drains past the fence in the back and into the creek that runs behind the house.
We now have the tiles in and gravel around the house. Gravity now takes care of any water issues that we have instead of having to rely on a silly little sump pump. We also installed a California drain across the driveway to catch all the water that flows down from the main road. I will never again worry about the rain.

The Guest Room

Again, we owe our thanks to Steve for doing the tear down in the guest room area. The workbench that was there was a beast to have to destroy and move. There was a huge nest of electrical wiring in the corner, and none of the plug ins or lights were to code...so..OUT it goes!


This is the wall that we put the doorway through to the guest room. Of course everything on it had to come down as well.

It was so nice to prime and paint the old yellowed drywall in this area. It had been up since the house was built in the 70's but nothing was ever done with it. The white immediately brightened everything up in this area.
Door is in, new light is installed, paint is dry and we are ready for house guests!


The Family Room

Peter's brother Robert was going to be out for a visit in September so it was about time that we started finishing the lower floor. Our upstairs was mostly done and I was getting tired of looking at the tv in the living room. When Pete's dad Steve was out, he saved us a ton of hours by stripping down everything in the family room area. This is what it looked like before we started...
Everything came out. The carpet, the cedar on the walls, the multiple feet of wire, and all the beer can shelving. The cedar was bone-dry and was just begging to start a house fire! All the electrical plugs were not done to code and were too far up the wall. The nutcase had 4 powerbars downstairs all plugged into one corner, and to this day I'm trying to figure out what the heck he needed 24 plug-ins for.

Peter took care of all the construction and I did all the finishing. What a job! There were so many freeking drywall corners to do I was going nuts! Now I can look at our home and say, "I did that" with a lot of pride.